Scheduling
Overview
At the beginning of each semester, you need to set up your clinical rotations with each preceptor in the clinical tracking software in order to initiate the site and preceptor evaluations at the end of each rotation. The purpose of creating a schedule with each preceptor is to initiate the evaluations being sent at the end of each rotation. This is the only way to have the final evaluation completed.
Important Notes
A few important notes about scheduling:
- A schedule must be completed for each preceptor and site you are working with during the semester.
- The "educator" is your preceptor, not your course instructor.
- Regarding the timeframe:
- Schedule the entire rotation in one block on your schedule. Do not enter the days or weeks with a preceptor individually to avoid sending multiple evaluations to your preceptor.
- Do not attempt to backdate a schedule; eValue will not allow this. Use the current or tomorrow’s date for your start date and an end date at least five days from your start date.
- The time frame entered does not have to be exact.
- Enter the general time frame you intend to work with the preceptor.
- If you are unsure of your last day, put Week 16, Day 1 of the current semester as the end date. This allows your evaluations to be sent at the proper time.
- You cannot have multiple schedules that begin on the same date. You must stagger your start dates.
- If you later need to change the end date, email evalueadmin@Maryville.edu with the course, preceptor, site and start/end dates and ask them to generate the evaluations.
- If you add a preceptor during the semester, you will be able to add a new schedule.
- If you cannot locate your approved preceptor and/or site, email evalueadmin@Maryville.edu with the following information and they will resolve it so that you are able to enter the schedule correctly:
- Your concentration
- Your preceptor's name and correct email address
- Your site name
Set Up a Scheduling Request
- Log into eValue.
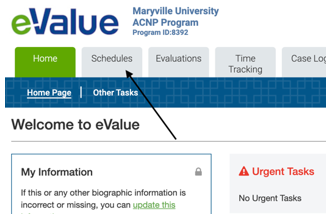
- Choose the Schedules tab from the Home Page, as shown in the following image:
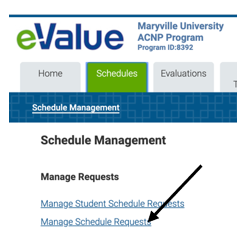
- Select Manage Schedule Requests, as shown in the following image:
- Complete the scheduling section for one preceptor and one site you plan to work with this semester.
- Verify that the information is correct including the preceptor’s email address, as shown in the following image:
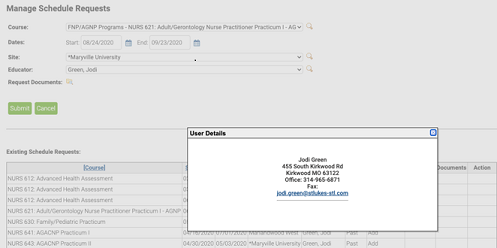
- If the email is not correct, contact your clinical course instructor to update the email in eValue.
- If all the information is correct, select Submit, as shown in the following image:
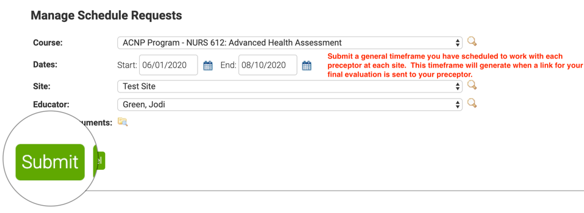
- Select the general timeframe you have scheduled to work with each preceptor at each site. The End Date will determine when the link for your final evaluation is sent to your preceptor. The evaluations will be generated five days before the end date you set in your schedule. It is a best practice to make this during Week 15 of your course.
- "Educator" is your preceptor, not your instructor.
- Use the magnifying glass next to your preceptor to check that the correct email address is on file. If it is incorrect, contact your clinical course faculty to update in eValue.
- Repeat for each preceptor and each site.
- You can add preceptors throughout the semester as necessary; however, you will need to use the current or a future date as the start date.
- Once you have submitted a request, it will show up in the table at the bottom, as shown in the following image:

Print as PDF
- Select the Reports tab from the Home Page, as shown in the following image:

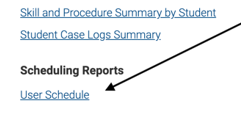
- Under Scheduling Reports, select User Schedule, as shown in the following image:
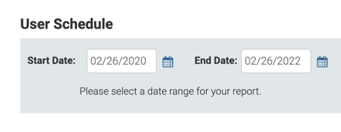
- Choose your timeframe Start Date and End Date for the schedule you want to submit, as shown in the following image. Include dates for all preceptors and sites for the current semester.
- Select Next.
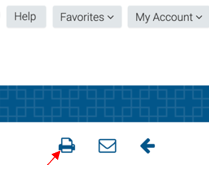
- Select the printer icon at the top right of the page, as shown in the following image:
- In the Destination dropdown, select Save as PDF, as shown in the following image:

Note: Your options will vary depending on the printers you have installed.
What to Submit
Submit the Adobe PDF to the course assignment as documentation that this is complete.